Saturday, December 29, 2012

Chalkboard Sign for a Wedding

A friend of mine asked me if I would make a chalkboard sign
for her sister's wedding.
Of course, I was more than happy to!
I lOvE doing chalkboard art.
I don't know why...other than it thrills me to be able to look at something,
and re-create it with the chalk... as chalk is so forgiveable and easy to change.
Besides that, it looks SO good!

They are having a Italian Soda Bar.
She gave me the info, I did a bit of research,
then made my own design.


The details of the lower section:


My biggest problem is trying to clean up the residue dust and chalk.
Anyone have any ideas for me?

Thanks for visiting!

danella

Wednesday, December 26, 2012

Merry Christmas!!!

Merry Christmas to all our Friends!
Hope you had a wonderful day, spent with loved ones.

We spent the day with our daughter and her family.
Such fun times... the best watching the kiddos tear open their gifts...
AND...
EACH and every time, they would 'run' to the gift giver and give a
HUGE HUG.
So sweet.  Made me wish I gave a LOT of gifts!
(Not that we don't ALWAYS get a lot of hugs)

Will always treasure the memories.

Today, the day after Christmas I'll share a quick layout I did the day before Christmas!

This picture is from 2008.
Yeah, a long time ago...but it was hanging around, and I needed something now.
...besides that, it was so CUTE.


 This layout has the simple 'key' to easy layouts...
THREE focus areas that surround the photo...
draws your eye around.

#1
Most of you know, I love Heidi Swapp and her style...
I love her little 'banners & flags', but alas, I have none, so I made my own.


#2
 I've had the [plastic] accents for a LONG long time.
Decided to use 'em, especially 'cause my daughter said she liked 'em!
(they are from Making Memories & Yellow Bicycle)


#3
...and last, but not least:
A printable from Heidi Swapp's blog.
She gave out freebies that I downloaded and printed up.
LOVE THEM!
If you want some, you can go HERE.
(takes you to the one that I printed for this layout,
but if you look on her other entries, you will find more... 12 total!)
...and when I went to her blog, she shares ONE MORE!
A TAG one.
Talk about generous.


So.
Cute and easy.
The best part?
Giving it to my daughter...
and receiving her...
"Oh Mom!  I LOVE it!!!! Soooo cute!"

So worth it.

Love you all...
danella

Friday, December 21, 2012

The Birthday Gift

As I mentioned, I would share the gift we made for our grandson.
Actually my hubs made it!  All I did was purchase the two race cars.
The cars were purchased at Fry's (part of Kroger) here in town.
They were just under $5 each.  
They are the type that you pull back, and let go,and they zoom on their own.
The assortment at the store has several different types of COOL cars to choose from.
(I, of course, want to get a BUNCH of 'em over time!)

I left for work one day, with 'instructions' to Terry to make something that would work!
It had to be made outta wood, not cost anything, have sides so the cars wouldn't fall off,
have an END, be long enough and wide enough to fit both cars to RACE.
By the time I came home, he was done!
I LOVED it!
It was SO FUN for us two to play... then came the test of the kiddos.
Would they like it?


The idea was to pull back from the second 'line' (red duct tape!)
to the first line, which was the starting line. 


You can see the 'excitement'... I think we were successful.

 
The kiddos were so cute.
Here are some cool details of the RACE.
 
READY, SET, GO!
 

Neck to Neck... they GO!
 

RED BULLET is getting AHEAD!!!
 

It was a tight... nose to nose race,
BUT....
YELLOW HORNET WON!!!!
 

 Here they are, coming back for another race!


thanks for visiting!

danella


Tuesday, December 18, 2012

A Countdown

I've shown this stand that we made... 
that we've given away to friends, and kept one.
The white stand in the middle, that has a metal backing.


 My darling daughter wanted a bigger one, 
AND she came up with the idea of adding a peg on the side!


She and I had made a fun trip to Phoenix with the kiddos,
and went to a great Scrapbook store, Scrapbooks, etc.
We went there TWO days, it was SO much fun!
AND... came home with a sheet of paper, that had the Christmas countdown numbers.
(For the life of me, I didn't take a before photo, AND I don't remember the brand...dang)
***I found it!!!  It's Authentique...this year's Christmas collection!!!
But I asked my daughter, 'what do you want done with it?'.
She wanted 'em cut up and glittered, so we did it.
Then what???
They sat for a while... several weeks.
Until I gave her the stand...

 and she decided to hang 'em on the peg!
SO CUTE!


thanks for visiting!

danella

Monday, December 17, 2012

Our Christmas Home Reveal - Part 4

It's been a whole week.  I can hardly believe it.
We did the Church Christmas Party on Tuesday (Dec. 11)...
which took us the whole day.
I was even painting one of my tables THAT DAY.
(cRaZy woman)
Then after... the afterMATH... giant mess.
I had taken down a bunch of my decor to use,
so I had to put it all back...
AND I ended up giving my daughter the NOEL that I had made...
so I had to redo the mantel a bit.
AND... clean up the house, do the dishes, work, and ... 
well, I'm sure you all get the picture, huh?

So, here it is a week after my last post.
I'm off today, AND today is our grandson's birthday...
wait til I share with you what we made for him!!!
SO FUN!

But I'm finally sitting here at my desk, continuing the showing of our Christmas Home.
ha

This is our 'mantel' that's not really a 'real' mantel, but it serves as one.
We made the shelf with reclaimed wood from,
you won't believe it, but from a blown down, destroyed old pump house!
Yeah... really!
It just happened to have some BEAUTIFUL old torn up wood that was too nice to toss.
So... we made it into our mantel.


 Told ya the wood was beautiful!
See the 'window' frame above?
It's not a window frame!!!
Terry did a 'clean-up' job one time, which included a 'broken' bathroom vanity.
He saved the wood... and it sat outside for a long time.
I 'found' the piece...it was the front framing for the vanity... OAK.
All washed out and faded... 
I simply dry-brushed a bit of white paint, and voila!
FREE
(I LOVE free the best, you know)

Below are DETAILS


 I LOVE the twig tree.
Terry made it.
 The twigs are slid unto a heavy wire that he cut from another 'throw-away' piece.
He made the star.


Below is the 'NOEL' that I made.
All from scrap pieces of wood... old stuff.
Terry cut it all for me (he just can't handle it, ME cutting you know)
I painted a small vine wreath black, and added the holiday decor that I already had on hand.
I ended up adding a base to it, to take it to the Christmas Party.
The base was a drawer front from the aforementioned bathroom cabinet! 


 NOW, since I gave the NOEL to my daughter, 
I had to substitute something in the 'spot'.
I added a picture of the Nativity to my magnet stand,
and Terry had made the cute little trees,
and... I found an old cheese server with the glass dome,
that I painted, distressed, and added a metal candleholder to the bottom!
It is SO cute!


More details...


And last,
Here is a picture of the whole wall, with our 'entertainment' table below.

 
Thanks for visiting!

danella


Tuesday, December 11, 2012

Our Christmas Home Reveal - Part 3

Today, I'm super short on Time.
I'm decorating for a Church Party, which I'll share photos with you later.
So.

I only have ONE picture for you today!

I have a cool wreath holder that I've held onto for years.
And NO wreath!
Believe it or not!
I don't know why... it's not like I can't make a wreath for pete's sake.
What's with that?

So, I did a really really FAST one.
On a vine wreath that I've had... forever.
I had a bunch of rusty tin snowflakes, from my Craft Warehouse days in Oregon.
I love the snowflakes, but they don't show up much on the tree,
especially the tiny one I have!

I think I may paint the snowflakes... a distressed white?
This year? Next?

But here is the wreath.


Thanks for visiting today!

danella

Monday, December 10, 2012

Our Home Christmas Reveal - Part 2

Today, I'll share the living room window wall.
Our home is small.
Just not a lot of space/walls/windows to do much.
Gotta keep it simple?
(me, simple???)

This wall shows our TREE!
It's a small alpine that I got from Craft Warehouse YEARS ago.
I sold our big white frosted one last year.
It was just too big for the house and us.

So, coming around the corner from the dining room,
you see this:


I've collected icicles for many years.
They are all glass.
Those and snowflake ornaments are about the only items that I buy.
None this year though.

We had to really think how to show the icicles off.
So I ended up taking the curtains down,
[which, now I never want to put 'em up again!]
And putting a beautiful branch that Terry had on the curtain rod holders.
It worked fantastic!
...and was perfect for hanging the icicles.
We added lights around the window to make the icicles sparkle.


The Christmas sign I made this year.
Found the style on Pinterest.
(You can find the pin here.)
(Pinterest won't 'let me' go back to the link...)
Searched for, and found some lettering that I liked,
printed it out ... outline only... and after transferring it to the board, I painted it.
Quick and easy.
The board was an old one, already painted white and distressed!
 

And the little TREE.

 
Terry carved the cute bear a few years ago.
It's about all we have left of his carvings... I keep trying to KEEP it, 'cause I love him!
The log came from our 'old' dining room table that we no longer have.
(I will share the 'new' table soon)
And Terry also made the cute birdhouse you see!
The little 'gift' at the bottom, is something I had bought years ago.
It's a box, and I love it.


The sweet angel bear!


Lastly, the details of the little tree.


...and close-up.


Tomorrow I will share our 'mantle'.
We don't have a fireplace, or even a fake one.
But a big beautiful shelf, YES!

Thanks for visiting!

danella

Sunday, December 9, 2012

Our Christmas Home Reveal... part 1

It's getting closer to Christmas day by day.
And we still have so much to do!
BUT...
we are done with decorating our home.
YAY!

I'm sharing the decor in parts...
as there is just too much for one post.
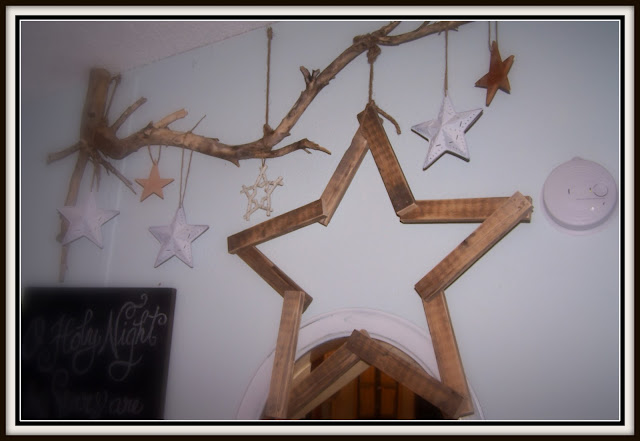
Today, the dining room wall.

Since everyone is a 'friends use the back door' guest...
(our house is turned around on our property, don't ask me why...
so that the back of the home is the first part you see...
so everyone uses the back door to come in.
-sigh-)

So this is the first part you see when you come into our home.
(the pictures are only gonna show the wall!  Not the dining room table, etc.)


 We made or up-cycled almost everything you see!
Our daughter gave us the Nativity years ago.
Terry cut the trees this year.
I drew, he cut.
He used some cedar boards leftover from other projects.


The stars we either made or already had.
The big one, that I LOVE, we made from a project that
Holly from Down to Earth Style shows on her blog.
I LOVE her blog and her ideas.
 (if you click on the highlighted text, it will take you straight to the instructions of how to make the star!)
 We hung the cool branch to hooks towards the ceiling...


Details...


Terry made the chalkboard some time ago.
I change out the lettering/signing here and there.
This lettering I found on Pinterest.
You can find it on my Pinterest, under Christmas Wishes.
(unfortunately, I can't find the original... I'll have to keep hunting)
I loved it. And it was perfect for what I was looking for.
So I simply propped it up near my computer,
and copied the lettering with chalk, of course!


Then, the TREE.
I LOVE this tree!
I didn't know what I was going to think, when I was making it.
But, when I was done...
oh my!


Terry, of course, found the branches, and cut them, and wired 'em together.
I covered the wire with jute...
then added the cardinals that I had taken out of our old tree.
...and the moss and berries.
Terry cut the star for me.
And the pot, we got on a clean-up that Terry did...for FREE...
I painted it, and added the velvet ribbon.
Such FUN!
The 'candles', Terry cut, and drilled the holes for the battery operated tea lights.
Cute, huh?


Come back for a visit tomorrow, and I'll share Part 2!
thanks for visiting!
danella